
Dungeon Picnic Mapless Exploration
Event picks, 00/10 progress, enemy nodes, and the rest-versus-rush bet.
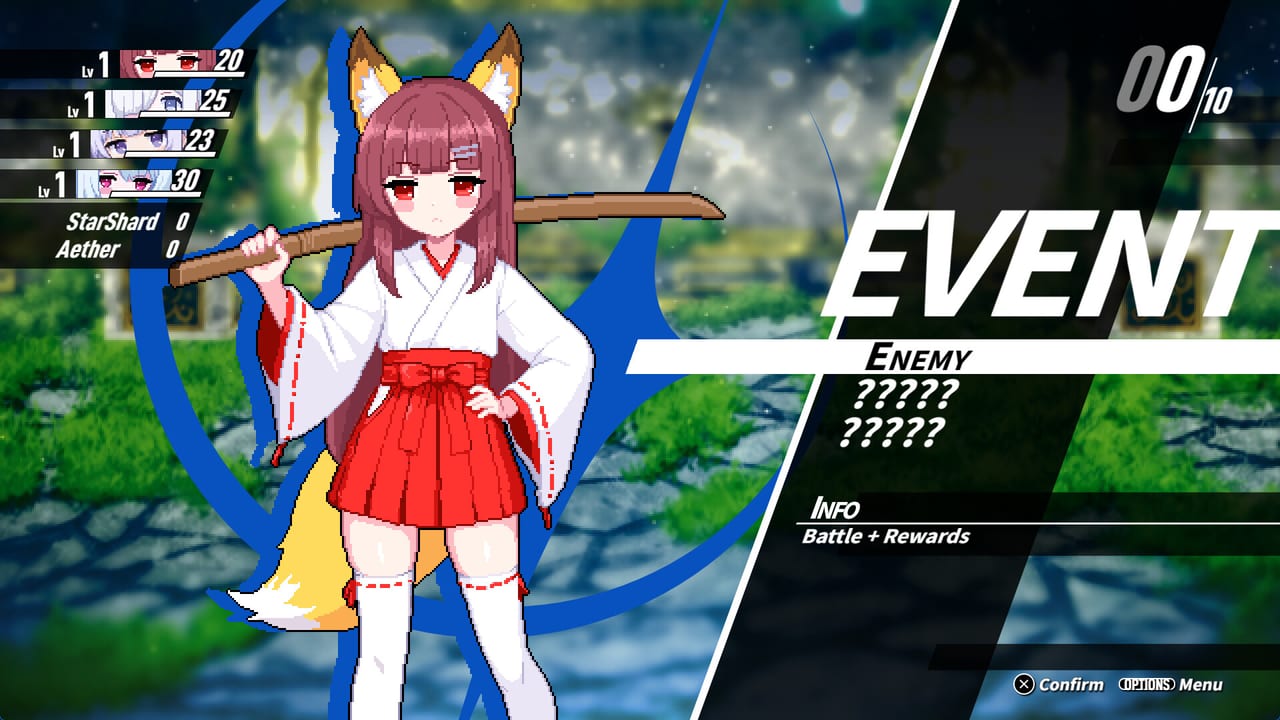
Dungeon Picnic does not hand you a floor plan. There is no minimap to complete, no fog tile to clear, and no compass that proves you walked every corridor. Exploration is a sequence of labeled events you choose under a progress counter that looks like 00/10. Each pick is a bet with HP, shared Mana, and the two currencies the route uses: StarShard for Level Up and Aether for the other sinks. This page is how to read those bets in the limited demo’s first area. The product version is still to be announced; nothing here assumes a later overworld.
If you are still learning the install and wipe, start with Getting Started. If the fights inside a node are the problem, use ReAct combat. Demo length and save rules sit in the demo guide.
How a mapless route actually looks
You are shown events, not rooms. A typical enemy node is written in the spirit of EVENT ENEMY ????? and tagged with Battle + Rewards. The question marks are the point: you are buying a fight without a full scouting report. Other events can be less hostile, but the demo still asks you to choose rather than to wander. The 00/10 style counter tells you how much of the current stretch you have consumed. 00/10 is early. 09/10 is a different conversation, because a wipe here wastes a kit you already paid for in shards.
Kannagi’s fox-eared shrine-maiden portrait showing up on an event screen does not mean the node is safe. Aries Knight’s maid-knight look does not mean the node is a duel you are supposed to take. Read the label, read your MN, read HP, then pick. The controls guide is useful here because Confirm / Get sits on X, Back sits on Circle, and it is easy to confirm a node you meant to inspect.
Treat the first area as a short laboratory, not as a completionist checklist. The limited demo that started 6 September 2026 is one area with four heroines. You will not unlock a hidden fifth map by hitting every enemy node. You will only bleed the shared pool dry.
Enemy nodes, Battle + Rewards, and when to skip
Enemy nodes are the obvious StarShard engine. They are also the obvious wipe engine. A Battle + Rewards tag means the picnic is offering you a fight that should pay. It does not mean the fight is priced for your current MN. If you just spent 2 MN on Heal All and 2 MN on Unlimited Meteor, you are not in a rewards mood; you are in a rest mood even if the UI still dangles a node.
Skip rules that survive a wipe:
- Skip when you cannot afford a 2 MN heal after the opening comet. Shared Mana is the real HP bar; see combat.
- Skip when Counter Heal is on cooldown 6 and you have no backup Heal All.
- Skip when the 00/10 counter is high and the kit on Set Skill is already good enough to spend on Level Up instead of on another random fight.
- Take the node when Breaks have been easy, recovery has been ticking, and you still need Star Shards for Starting Mana at cost 3.
Poison Injection at 1 MN can make a taken node cheaper than it looks, because chip plus Break is less of a tank drain than a 2 MN opener. Meteor remains a poor exploration tool: it wins a node and then puts every skill on cooldown before the next event. If 00/10 is not finished, you still have to walk.
StarShard, Aether, and what a rest is for
StarShard (Star Shards) fuels the Level Up screen: character options at cost 1, Starting Mana at cost 3, and random rows that can show SHARD 03. Aether is the other currency you collect on the route. They are not interchangeable. Dumping every pickup into one pile is how you arrive at Equipment with nothing to do and at Level Up with a tank that cannot pay for Apothecary.
Rest versus rush is the real exploration skill. Rest means taking a milder event, spending an Item, or simply not grabbing EVENT ENEMY ????? because Formation is wounded. Rush means chaining Battle + Rewards while Breaks are cheap and ReAct extra turns are paying you MN. Rush is correct when Astrologia is landing Hellfire Comet or Blizzard Comet on weaknesses and cooldown reduction on Break is keeping the kit ready. Rest is correct when Kannagi or Aries Knight is holding the line on leftover HP and you still need those bodies for the next stretch.
A wipe deletes skills and equipment and randomizes the next run’s finds. Resting to protect a kit is rational inside a run and meaningless across runs. Do not rest forever to preserve a Meteor setup the demo will not transfer into the upcoming product version. Do not rush forever because the 00/10 counter looks like a score. The counter is a clock.
Reading the four heroines as route tools
Astrologia wants nodes where weaknesses exist, because Breaks refill the picnic. Apothecary wants enough quiet after a hard Battle + Rewards to let Counter Heal leave cooldown. Kannagi is the purification presence against evil-god flavor; use her as a reason to respect enemy nodes, not as a license to click every ?????. Aries Knight is the frontline look; if her HP is the first to collapse, you are rushing too hard for the Formation you set.
Roster screens for Harvester and Samurai can distract you on the route. Harvester’s Mercy Scythe and ally-HP spend, Samurai’s First Star Fragment and first-action line, are equipment-and-status literacy. They are not secret demo branches. If an event seems to hint at a grim reaper or a sailor-uniformed duelist, still play the four you have. Party theory for those names lives on their pages and on party building.
Items from the Item menu are route insurance. Use them before a node you have already decided to take, not after a wipe screen. System is for settings, not for scouting. Status is how you confirm that SPD and HP still match the rush you are about to attempt.
A rest-versus-rush script for the first area
At 00/10 through 03/10, take a mix. Learn one enemy node’s rhythm. Spend Star Shards only if Starting Mana or a character option would have changed that fight. At mid-counter, rush only while 1 MN comets still Break something and the shared pool can pay a 2 MN heal. At late-counter, rest unless the rewards are the last shards you need for a planned Level Up row. File the result in your head: which event type paid Aether, which paid StarShard, which only paid a wipe.
Hardware and input still matter on the route. A gamepad is recommended; keyboard-only is allowed; mouse wheel helps lists. Specs are on system requirements. Wishlist and calendar context are on wishlist, demo launch notes, and Steam Next Fest from 19 October 2026. Official links sit on links. The guides hub sends you back to combat or party pages when the node was never the real problem.
Think of 00/10 as a budget with ten boxes, not as a map you failed to draw. StarShard buys the next Level Up choice; Aether buys the other pressure; HP and MN buy the right to open EVENT ENEMY ????? at all. If a stretch ends early, change the bet, not the fantasy of a hidden floor. The first area is short on purpose. The picnic’s exploration test is whether you can skip a rewards tag while you still look brave enough to click it.
Frequently Asked Questions
Quick answers for demo runs, ReAct combat, and party building.
Is there a dungeon map in Dungeon Picnic?
No. You choose labeled events under a progress counter such as 00/10. Enemy nodes look like EVENT ENEMY ????? with Battle + Rewards. Learn the loop here, then spend shards with party building.
What is the difference between StarShard and Aether?
StarShard (Star Shards) fuels Level Up, including character options at cost 1 and Starting Mana at cost 3. Aether is a separate route currency. Do not treat them as one pile. Menu context is in Getting Started.
When should I skip an enemy node?
Skip when shared MN cannot pay a 2 MN heal, when Counter Heal is on cooldown, or when the 00/10 counter is late and your kit is already worth protecting. Fight math is in the combat guide.
Does rushing every node make the demo easier?
No. The limited demo is one area with four characters. Extra nodes can empty the pool and force a wipe that deletes skills and equipment. Demo rules are on the demo guide.
Who should I keep in mind on the route?
The demo four: Astrologia, Apothecary, Kannagi, and Aries Knight. Roster pages for Harvester and Samurai are not extra demo branches.